


「OBD 單機部署上手體驗」:一步一步試玩 OBD 交互式部署,OceanBase 單機版搭建
(含命令 / 截圖 / 避坑)
個人簡介
作者: ShunWah
公眾號: “順華星辰運維棧”主理人。持有認證: OceanBase OBCA/OBCP、MySQL OCP、OpenGauss、崖山 DBCA、亞信 AntDBCA、翰高 HDCA、GBase 8a | 8c | 8s、Galaxybase GBCA、Neo4j Graph Data Science Certification、NebulaGraph NGCI & NGCP、東方通 TongTech TCPE 等多項權威認證。
獲獎經歷: 在OceanBase&墨天輪征文大賽、OpenGauss、TiDB、YashanDB、Kingbase、KWDB 征文等賽事中多次斬獲一、二、三等獎,原創技術文章常年被墨天輪、CSDN、ITPUB 等平臺首頁推薦。
- 公眾號_ID:順華星辰運維棧
- CSDN_ID: shunwahma
- OB社區_ID:shunwah
- 墨天輪_ID:shunwah
- ITPUB_ID: shunwah
- IFClub_ID:shunwah

前言:OBD 交互式部署 OceanBase 單機版的價值與本文定位
OceanBase 作為螞蟻集團自研的分布式關系型數據庫,憑借高可用、高擴展、高性能的特性,已廣泛應用于金融、電商、政務等核心業務場景。而 OBD(OceanBase Deployer) 作為 OceanBase 官方推出的部署與運維工具,極大簡化了數據庫的安裝、配置與管理流程——尤其是 OBD 3.5.0 版本,不僅支持可視化“白屏部署”,還保留了靈活的“交互式部署”模式,滿足不同用戶的操作習慣。
對于習慣命令行操作的開發者或運維人員而言,交互式部署通過向導式參數輸入,既能自主控制配置細節(如資源分配、存儲路徑、監控組件選型),又能實時反饋配置合法性,避免因參數錯誤導致部署失敗。本文將以 OceanBase 單機版部署 為核心,從“啟動部署向導”到“集群驗證”,再到“日常運維命令”,全程拆解交互式部署的每一步操作,同步提供實操截圖與關鍵注意事項,同時補充常見問題解決方案,幫助讀者不僅“會操作”,更能“懂原理、能排錯”,為后續搭建分布式集群或生產環境部署打下基礎。
一、使用 OBD 交互式部署單機版
上一章學習了白屏web界面引領OceanBase部署新紀元:告別命令行,擁抱可視化操作,參考鏈接:「OBD 單機部署上手體驗」告別命令行!OBD 白屏界面輕松部署 OceanBase。本章繼續學習交互式部署的核心是通過命令行向導引導用戶逐步輸入參數,無需提前編寫配置文件,適合需要靈活調整部署細節的場景(如自定義數據存儲路徑、按需分配 CPU/內存資源、選擇性安裝監控組件)。整個流程可分為“啟動向導→配置參數→確認部署→集群驗證”四大環節,以下為詳細實操步驟。
1. 啟動交互式部署向導
首先需執行 OBD 集群部署命令,并通過 -i 參數啟用交互式模式(-i 是 --interactive 的縮寫,明確指定“向導式輸入”)。命令中“ob_single_cli”為自定義集群名,建議根據業務場景命名(如“ob_test_cli”“ob_dev_single”),便于后續管理多個集群時區分。
obd cluster deploy -i ob_single_cli # "ob_single_cli" 為自定義集群名,可按需修改
(1)IP 地址配置
執行命令后,向導首先會提示輸入部署節點的 IP 地址,默認顯示當前服務器的內網 IP(如示例中的 127.0.0.1)。若部署節點就是當前服務器,直接按 Enter 鍵使用默認值即可;若需部署到遠程服務器,則輸入目標服務器的公網/內網 IP(需確保當前機器與目標機器網絡互通,且開放 SSH 端口)。
[root@worker3 obd350]# obd cluster deploy -i ob_single_cli
Enter the IP (Default: 127.0.0.1):

(2)用戶密碼驗證
確認 IP 后,向導會檢測當前登錄用戶(示例中為 root),并提示“不建議在生產環境使用 root 用戶部署”——這是因為 root 用戶權限過高,存在誤操作風險,生產環境建議創建專用運維用戶(如“admin”)并賦予必要權限。此處按提示輸入當前用戶(root)的密碼,完成服務器登錄驗證(密碼輸入時默認不顯示,輸入后按 Enter 即可)。
[root@worker3 obd350]# obd cluster deploy -i ob_single_cli
Enter the IP (Default: 127.0.0.1):
The current user is root. It is not recommended to use root user for deployment in production environment
Enter the current user password:

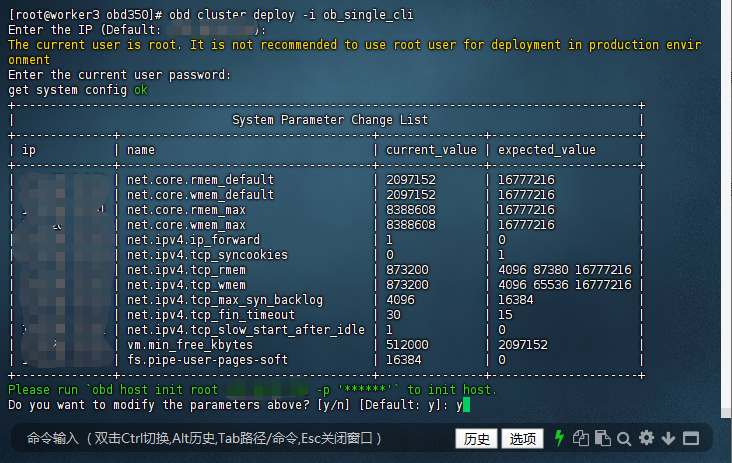
(3)系統參數檢查與初始化提示
密碼驗證通過后,OBD 會自動檢查當前服務器的系統參數(如網絡、內存、文件系統配置),并對比 OceanBase 推薦的參數值,生成“系統參數修改列表”。示例中顯示“net.core.rmem_default”當前值為 2097152,推薦值為 16777216,這類參數主要影響數據庫的網絡傳輸性能與內存管理效率。
向導會提示“執行 obd host init 命令初始化主機”,并詢問是否修改上述參數(默認選擇“y”)。若選擇“y”,OBD 會自動幫你調整參數;若選擇“n”,則需后續手動修改(不建議,可能導致部署失敗或數據庫運行異常)。
[root@worker3 obd350]# obd cluster deploy -i ob_single_cli
Enter the IP (Default: 127.0.0.1):
The current user is root. It is not recommended to use root user for deployment in production environment
Enter the current user password:
get system config ok
+-----------------------------------------------------------------------------------------+
|                               System Parameter Change List                              |
+--------------+------------------------------------+---------------+---------------------+
| ip           | name                               | current_value | expected_value      |
+--------------+------------------------------------+---------------+---------------------+
| 127.0.0.1 | net.core.rmem_default              | 2097152       | 16777216            |
| 127.0.0.1 | net.core.wmem_default              | 2097152       | 16777216            |
| 127.0.0.1 | net.core.rmem_max                  | 8388608       | 16777216            |
| 127.0.0.1 | net.core.wmem_max                  | 8388608       | 16777216            |
| 127.0.0.1 | net.ipv4.ip_forward                | 1             | 0                   |
| 127.0.0.1 | net.ipv4.tcp_syncookies            | 0             | 1                   |
| 127.0.0.1 | net.ipv4.tcp_rmem                  | 873200        | 4096 87380 16777216 |
| 127.0.0.1 | net.ipv4.tcp_wmem                  | 873200        | 4096 65536 16777216 |
| 127.0.0.1 | net.ipv4.tcp_max_syn_backlog       | 4096          | 16384               |
| 127.0.0.1 | net.ipv4.tcp_fin_timeout           | 30            | 15                  |
| 127.0.0.1 | net.ipv4.tcp_slow_start_after_idle | 1             | 0                   |
| 127.0.0.1 | vm.min_free_kbytes                 | 512000        | 2097152             |
| 127.0.0.1 | fs.pipe-user-pages-soft            | 16384         | 0                   |
+--------------+------------------------------------+---------------+---------------------+
Please run `obd host init root 127.0.0.1 -p '******'` to init host.
Do you want to modify the parameters above? [y/n] [Default: y]:
完成系統參數確認后,將進入核心的“部署參數配置”環節,需根據業務需求設置數據庫版本、節點信息、資源分配等關鍵配置。
2. 按向導配置參數(關鍵步驟)
這一環節是交互式部署的核心,所有參數直接影響 OceanBase 集群的運行性能與穩定性。以下按配置順序拆解每一步的意義與操作建議。
(1)選擇數據庫版本
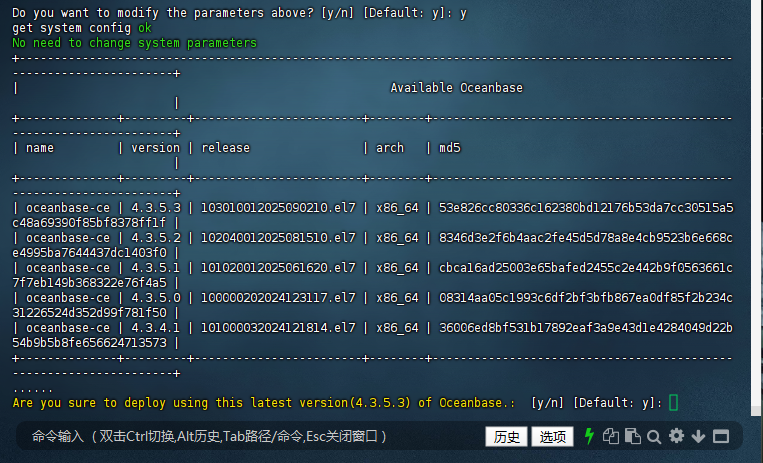
OBD 會自動列出當前可下載的 OceanBase 版本(默認優先顯示最新穩定版),示例中最新版本為 4.3.5.3(2025 年 9 月 2 日發布)。若需指定版本(如生產環境常用的 4.2.1 穩定版),可手動輸入版本號;若直接按 Enter 鍵,將使用默認推薦的最新版。
選擇版本后,向導會詢問“是否確認使用該版本部署”,默認選擇“y”(建議確認版本兼容性,如應用依賴特定版本的 SQL 語法,需選擇對應版本)。
Please input the oceanbase version [3.1.4]:  # 直接回車使用默認版本(示例中默認后續更新為4.3.5.3)

No need to change system parameters
+-----------------------------------------------------------------------------------------------------------------------------+
|                                                     Available Oceanbase                                                     |
+--------------+---------+------------------------+--------+------------------------------------------------------------------+
| name         | version | release                | arch   | md5                                                              |
+--------------+---------+------------------------+--------+------------------------------------------------------------------+
| oceanbase-ce | 4.3.5.3 | 103010012025090210.el7 | x86_64 | 53e826cc80336c162380bd12176b53da7cc30515a5c48a69390f85bf8378ff1f |
| oceanbase-ce | 4.3.5.2 | 102040012025081510.el7 | x86_64 | 8346d3e2f6b4aac2fe45d5d78a8e4cb9523b6e668ce4995ba7644437dc1403f0 |
| oceanbase-ce | 4.3.5.1 | 101020012025061620.el7 | x86_64 | cbca16ad25003e65bafed2455c2e442b9f0563661c7f7eb149b368322e76f4a5 |
| oceanbase-ce | 4.3.5.0 | 100000202024123117.el7 | x86_64 | 08314aa05c1993c6df2bf3bfb867ea0df85f2b234c31226524d352d99f781f50 |
| oceanbase-ce | 4.3.4.1 | 101000032024121814.el7 | x86_64 | 36006ed8bf531b17892eaf3a9e43d1e4284049d22b54b9b5b8fe656624713573 |
+--------------+---------+------------------------+--------+------------------------------------------------------------------+
......
Are you sure to deploy using this latest version(4.3.5.3) of Oceanbase.:  [y/n] [Default: y]:
(2)配置節點與端口信息
單機部署場景下,節點列表默認是“127.0.0.1:2881”(127.0.0.1 為本地回環地址,2881 為 OceanBase 的 SQL 服務端口),直接按 Enter 鍵確認即可。若后續需擴展為分布式集群,此處需輸入多個節點的“IP:端口”(用逗號分隔)。
隨后向導會提示配置 3 個關鍵端口與 root 密碼:
- OB SQL 端口(默認 2881):用于客戶端(如 obclient、MySQL 客戶端)連接數據庫;
- OB RPC 端口(默認 2882):用于集群內節點間通信(單機部署也需保留,為后續擴展做準備);
- obshell 端口(默認 2886):用于通過 obshell 工具管理 OceanBase(如執行備份、恢復命令);
- OB root 密碼(默認生成隨機密碼):系統租戶(sys)的 root 用戶密碼,建議手動設置復雜密碼(如包含大小寫、數字、特殊符號),避免使用默認密碼(示例中默認密碼為 GkVhFJClHO419jbTbjo7,生產環境需修改)。
Please input the server list [127.0.0.1:2881]: # 單機部署默認本地地址,回車確認
Are you sure to deploy using this latest version(4.3.5.3) of Oceanbase.:  [y/n] [Default: y]: y
Enter the OB SQL port (Default: 2881):
Enter the OB RPC port (Default: 2882):
Enter the obshell port (Default: 2886):
Enter the OB root password (Default: GkVhFJClHO419jbTbjo7):

(3)配置系統租戶資源
OceanBase 中的“租戶”是資源隔離的基本單位,系統租戶(sys) 負責管理整個集群(如創建業務租戶、分配資源),需為其分配 CPU 與內存資源:
- 系統租戶內存(默認 2G):建議根據服務器總內存調整,如 8G 內存服務器可分配 2G,16G 內存服務器可分配 4G(內存不足會導致系統租戶啟動失敗);
- 系統租戶 CPU 核數(默認 2):建議不低于 2 核,若服務器 CPU 核數較少(如 4 核),可保持默認值;若為 8 核及以上,可適當增加(如 4 核),提升系統租戶的管理效率。
示例中向導還提示配置“OB 總 CPU 數”(默認 8)與“OB 內存限制”(默認 13G, configurable range 6-13G),這是整個 OceanBase 實例可使用的總資源(包含系統租戶與后續創建的業務租戶),需根據服務器硬件配置調整——如 8 核 16G 服務器,可設置“CPU 數 8”“內存限制 8G”(預留部分內存給操作系統與其他服務)。
# 系統租戶內存大小(默認 2G)
Please input the observer system tenant memory size [2G]:

# 系統租戶 CPU 核數(默認 2)
Please input the observer system tenant cpu number [2]:
Enter the OB cpu count (Default: 8):
Enter the OB memory limit (Configurable Range[6, 13], Default: 13, Unit: G): 8

(4)配置數據與日志存儲路徑
OceanBase 的數據(如用戶表、索引)與日志(如事務日志、運行日志)需存儲在獨立路徑,默認路徑為“/home/admin/oceanbase/data”(數據)與“/data/log1/ob_single_cli”(日志)。建議根據服務器磁盤布局修改路徑,遵循以下原則:
- 數據路徑與日志路徑盡量分開存儲(如分別掛載在不同磁盤),避免 I/O 競爭;
- 路徑需為絕對路徑(示例中用戶輸入“data/ob43”被提示錯誤,需改為“/data/ob43”);
- 確保路徑所在磁盤有足夠空間(建議數據盤不小于 20G,日志盤不小于 16G)。
示例中用戶將“OB 安裝目錄”修改為“/data/ob43”(存儲 OceanBase 程序文件),數據路徑與日志路徑使用默認值(也可根據實際情況調整)。
Please input the data_dir [/home/admin/oceanbase/data]: /data/ob/data # 自定義路徑(示例中用戶后續調整為默認絕對路徑)
Enter the OB installation directory (Default: /root/ob_single_cli): /data/ob43
Enter the OB data directory (Default: /data/1/ob_single_cli): data/ob43
The directory must be an absolute path. Please try again.
Enter the OB data directory (Default: /data/1/ob_single_cli):
Enter the OB log directory (Default: /data/log1/ob_single_cli):

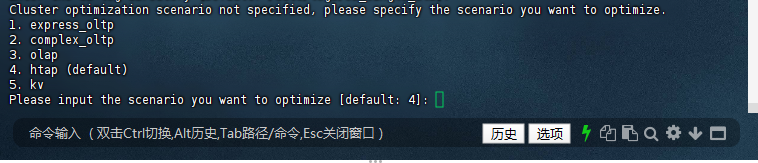
(5)選擇集群優化場景
OceanBase 支持多種業務場景的優化配置,向導會列出 5 種場景供選擇:
- express_oltp:輕量 OLTP(在線事務處理),適合并發量較低的簡單事務場景(如小型電商訂單系統);
- complex_oltp:復雜 OLTP,適合高并發、復雜事務場景(如金融核心交易系統);
- olap:OLAP(在線分析處理),適合大數據量分析查詢場景(如報表統計、數據挖掘);
- htap(默認):混合事務/分析處理,兼顧 OLTP 與 OLAP 場景(如實時數據分析業務);
- kv:鍵值存儲場景,適合以鍵值查詢為主的業務(如緩存、配置存儲)。
需根據業務類型選擇,示例中選擇默認的“htap”場景(若不確定業務場景,選擇 htap 是穩妥的選擇)。
Cluster optimization scenario not specified, please specify the scenario you want to optimize.
1. express_oltp
2. complex_oltp
3. olap
4. htap (default)
5. kv
Please input the scenario you want to optimize [default: 4]:
(6)配置日志磁盤與數據文件大小
接下來需設置日志磁盤大小與數據文件最大容量:
- 日志磁盤大小(默認 22G,范圍 16-22G):存儲事務日志(clog),日志磁盤不足會導致事務無法提交,建議設置為 16-22G(示例中用戶設置為 16G);
- 數據文件最大容量(默認 102G,范圍 16-102G):存儲用戶數據,超過該容量后需擴展磁盤或清理數據,示例中用戶設置為 22G(測試環境可適當減小,生產環境需根據數據量預估)。
Enter the log disk size (Configurable Range[16, 22], Default: 22 , unit: G): 16
Enter the datafile maxsize (Configurable Range[16, 102], Default: 102 , unit: G): 22

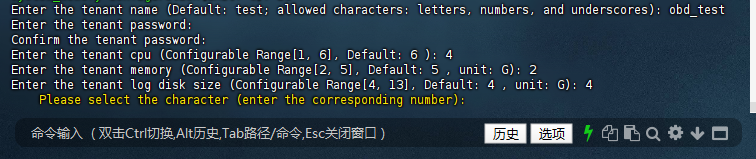
(7)創建業務租戶(可選)
系統租戶(sys)僅用于集群管理,業務數據需存儲在業務租戶中。向導會詢問“是否創建業務租戶”,默認選擇“y”(建議創建,避免直接使用系統租戶存儲業務數據,保證資源隔離與數據安全)。
創建業務租戶需配置以下參數:
- 租戶名稱(默認 test):建議根據業務命名(如“obd_test”“order_tenant”),僅支持字母、數字與下劃線;
- 租戶密碼:業務租戶 root 用戶的密碼,需與系統租戶密碼區分,建議設置復雜密碼(示例中用戶設置為“caip2018!”);
- 租戶 CPU(默認 6 核,范圍 1-6 核):根據業務并發量分配,示例中用戶設置為 4 核;
- 租戶內存(默認 5G,范圍 2-5G):需小于 OB 總內存限制,示例中用戶設置為 2G;
- 租戶日志磁盤(默認 4G,范圍 4-13G):存儲業務租戶的事務日志,示例中用戶設置為 4G。
Do you want to create tenant for your business workload? [y/n] [Default: y]: y
Tenant: sys conifguration: 2C/2G/3G(CPU/Memory/Log disk)
system_memory configuration(Unit: G): 1G
Enter the tenant name (Default: test; allowed characters: letters, numbers, and underscores): obd_test
Enter the tenant password:
Confirm the tenant password:
Enter the tenant cpu (Configurable Range[1, 6], Default: 6 ): 4
Enter the tenant memory (Configurable Range[2, 5], Default: 5 , unit: G): 2
Enter the tenant log disk size (Configurable Range[4, 13], Default: 4 , unit: G): 4
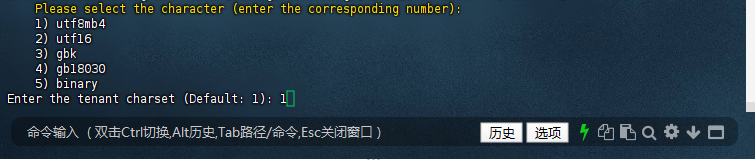
Please select the character (enter the corresponding number):
(8)配置租戶字符集、排序規則與時區
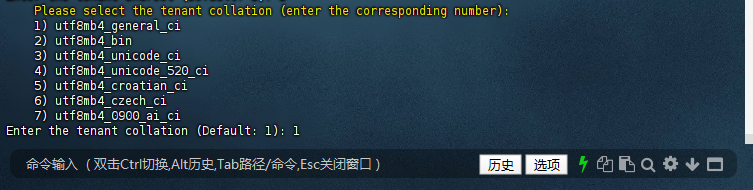
業務租戶創建后,需設置字符集、排序規則與時區,確保與應用程序兼容:
- 字符集(默認 utf8mb4):支持 emoji 表情與多語言,是當前主流選擇(其他選項如 gbk 適合中文場景,但兼容性不如 utf8mb4);
- 排序規則(默認 utf8mb4_general_ci):ci 表示“不區分大小寫”,適合大多數業務;若需區分大小寫,可選擇“utf8mb4_bin”;
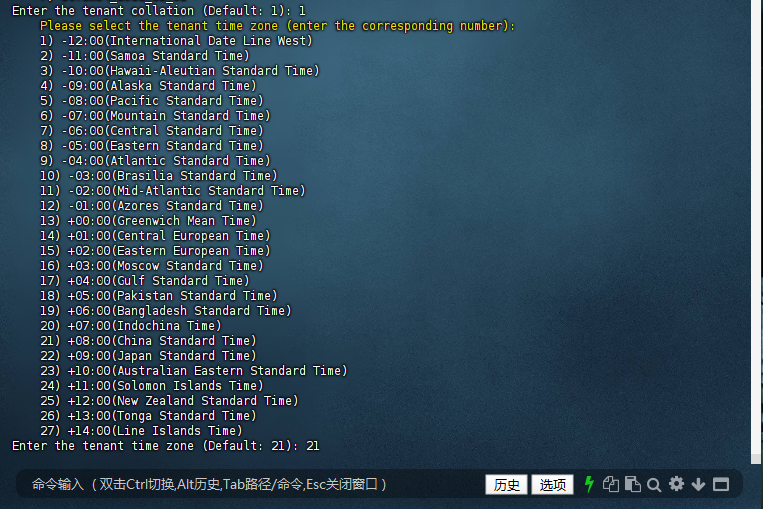
- 時區(默認 +08:00 中國標準時間):需與應用程序時區一致,避免時間字段計算錯誤(示例中選擇默認的 21 號選項“+08:00”)。
此外,向導還會詢問“表名大小寫敏感性”,默認選擇“1”(表名存儲為小寫,查詢時不區分大小寫),符合大多數用戶的使用習慣;若需嚴格區分大小寫,可選擇“0”。
    Please select the character (enter the corresponding number):
    1) utf8mb4
    2) utf16
    3) gbk
    4) gb18030
    5) binary
Enter the tenant charset (Default: 1): 1
    Please select the tenant collation (enter the corresponding number):
    1) utf8mb4_general_ci
    2) utf8mb4_bin
    3) utf8mb4_unicode_ci
    4) utf8mb4_unicode_520_ci
    5) utf8mb4_croatian_ci
    6) utf8mb4_czech_ci
    7) utf8mb4_0900_ai_ci
Enter the tenant collation (Default: 1):
Please select the tenant time zone (enter the corresponding number):
    1) -12:00(International Date Line West)
    2) -11:00(Samoa Standard Time)
    3) -10:00(Hawaii-Aleutian Standard Time)
    4) -09:00(Alaska Standard Time)
    5) -08:00(Pacific Standard Time)
    6) -07:00(Mountain Standard Time)
    7) -06:00(Central Standard Time)
    8) -05:00(Eastern Standard Time)
    9) -04:00(Atlantic Standard Time)
    10) -03:00(Brasilia Standard Time)
    11) -02:00(Mid-Atlantic Standard Time)
    12) -01:00(Azores Standard Time)
    13) +00:00(Greenwich Mean Time)
    14) +01:00(Central European Time)
    15) +02:00(Eastern European Time)
    16) +03:00(Moscow Standard Time)
    17) +04:00(Gulf Standard Time)
    18) +05:00(Pakistan Standard Time)
    19) +06:00(Bangladesh Standard Time)
    20) +07:00(Indochina Time)
    21) +08:00(China Standard Time)
    22) +09:00(Japan Standard Time)
    23) +10:00(Australian Eastern Standard Time)
    24) +11:00(Solomon Islands Time)
    25) +12:00(New Zealand Standard Time)
    26) +13:00(Tonga Standard Time)
    27) +14:00(Line Islands Time)
Enter the tenant time zone (Default: 21):
    Please select case sensitivity for table names:
    0) Table names are stored as specified and compared case-sensitively
    1) Table names are stored in lowercase and compared case-insensitively
    2) Table names are stored as specified but compared case-insensitively
Please enter your choice [0/1/2] [default 1]:

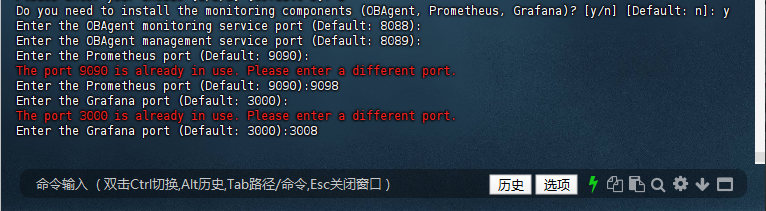
(9)安裝監控組件(可選)
OceanBase 提供 OBAgent(監控數據采集)、Prometheus(監控數據存儲與分析)、Grafana(監控面板可視化)三大監控組件,向導會詢問“是否安裝”,默認選擇“n”。若需實時監控集群狀態(如 CPU 使用率、內存占用、SQL 執行效率),建議選擇“y”。
安裝時需配置各組件的端口,若端口被占用(如默認的 Prometheus 9090 端口、Grafana 3000 端口),需修改為未占用的端口(示例中用戶將 Prometheus 端口改為 9098,Grafana 端口改為 3008)。可通過 netstat -tuln | grep 端口號 命令提前檢查端口是否被占用。
Do you need to install the monitoring components (OBAgent, Prometheus, Grafana)? [y/n] [Default: n]: y
Enter the OBAgent monitoring service port (Default: 8088):
Enter the OBAgent management service port (Default: 8089):
Enter the Prometheus port (Default: 9090):
The port 9090 is already in use. Please enter a different port.
Enter the Prometheus port (Default: 9090):9098
Enter the Grafana port (Default: 3000):
The port 3000 is already in use. Please enter a different port.
Enter the Grafana port (Default: 3000):3008
(10)確認配置并啟動部署
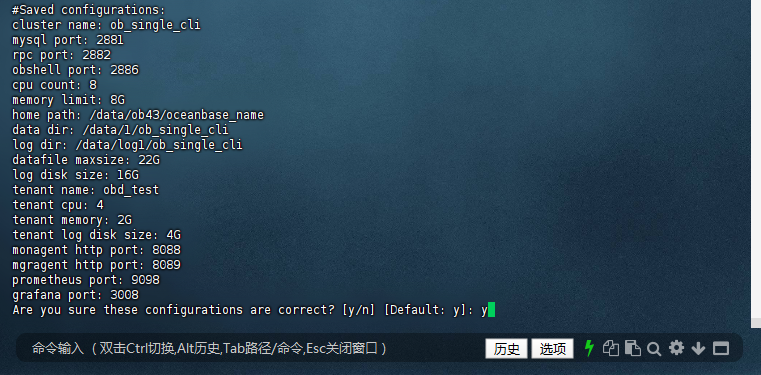
所有參數配置完成后,向導會列出完整的配置清單(如集群名、端口、資源分配、監控組件端口等),需仔細核對是否正確(尤其是密碼、端口、存儲路徑,錯誤配置會導致部署失敗或后續無法使用)。確認無誤后輸入“y”,OBD 會開始下載 OceanBase 安裝包、初始化目錄、配置組件,并啟動部署流程。
#Saved configurations:
cluster name: ob_single_cli
mysql port: 2881
rpc port: 2882
obshell port: 2886
cpu count: 8
memory limit: 8G
home path: /data/ob43/oceanbase_name
data dir: /data/1/ob_single_cli
log dir: /data/log1/ob_single_cli
datafile maxsize: 22G
log disk size: 16G
tenant name: obd_test
tenant cpu: 4
tenant memory: 2G
tenant log disk size: 4G
monagent http port: 8088
mgragent http port: 8089
prometheus port: 9098
grafana port: 3008
Are you sure these configurations are correct? [y/n] [Default: y]:
(11)密碼加密配置(可選)
向導最后會詢問“是否啟用密碼加密”(默認加密密鑰為 123456),默認選擇“n”(測試環境可暫不啟用,生產環境建議啟用,提升密碼安全性,需記住加密密鑰,后續修改密碼時需使用)。
Do you want to enable encryption for password security (default_encryption_passkey: 123456)? [y/n] [Default: n]: n

(12)部署過程與結果驗證
確認后,OBD 會執行以下操作:
- 檢查配置參數合法性;
- 下載指定版本的 OceanBase 與監控組件安裝包;
- 初始化程序目錄、數據目錄與日志目錄;
- 啟動 observer(OceanBase 核心進程)、obshell、監控組件;
- 初始化系統租戶與業務租戶;
- 驗證各組件健康狀態(如 observer 進程是否存活、Grafana 是否可訪問)。
部署成功后,向導會輸出集群信息(如 observer 節點狀態、數據庫連接命令、監控組件訪問地址),示例中 observer 狀態為“ACTIVE”,表示集群啟動正常。
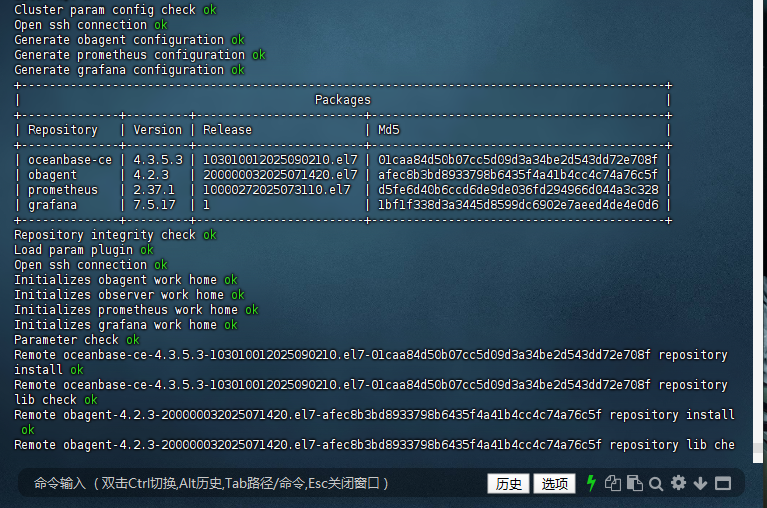
Cluster param config check ok
Open ssh connection ok
Generate obagent configuration ok
Generate prometheus configuration ok
Generate grafana configuration ok
+--------------------------------------------------------------------------------------------+
| Packages |
+--------------+---------+------------------------+------------------------------------------+
| Repository | Version | Release | Md5 |
+--------------+---------+------------------------+------------------------------------------+
| oceanbase-ce | 4.3.5.3 | 103010012025090210.el7 | 01caa84d50b07cc5d09d3a34be2d543dd72e708f |
| obagent | 4.2.3 | 200000032025071420.el7 | afec8b3bd8933798b6435f4a41b4cc4c74a76c5f |
| prometheus | 2.37.1 | 10000272025073110.el7 | d5fe6d40b6ccd6de9de036fd294966d044a3c328 |
| grafana | 7.5.17 | 1 | 1bf1f338d3a3445d8599dc6902e7aeed4de4e0d6 |
+--------------+---------+------------------------+------------------------------------------+
Repository integrity check ok
Load param plugin ok
Open ssh connection ok
Initializes obagent work home ok
Initializes observer work home ok
Initializes prometheus work home ok
Initializes grafana work home ok
Parameter check ok
Remote oceanbase-ce-4.3.5.3-103010012025090210.el7-01caa84d50b07cc5d09d3a34be2d543dd72e708f repository install ok
Remote oceanbase-ce-4.3.5.3-103010012025090210.el7-01caa84d50b07cc5d09d3a34be2d543dd72e708f repository lib check ok
Remote obagent-4.2.3-200000032025071420.el7-afec8b3bd8933798b6435f4a41b4cc4c74a76c5f repository install ok
Remote obagent-4.2.3-200000032025071420.el7-afec8b3bd8933798b6435f4a41b4cc4c74a76c5f repository lib check ok
Remote prometheus-2.37.1-10000272025073110.el7-d5fe6d40b6ccd6de9de036fd294966d044a3c328 repository install ok
Remote prometheus-2.37.1-10000272025073110.el7-d5fe6d40b6ccd6de9de036fd294966d044a3c328 repository lib check ok
Remote grafana-7.5.17-1-1bf1f338d3a3445d8599dc6902e7aeed4de4e0d6 repository install ok
Remote grafana-7.5.17-1-1bf1f338d3a3445d8599dc6902e7aeed4de4e0d6 repository lib check ok
ob_single_cli deployed
Get local repositories ok
Load cluster param plugin ok
Open ssh connection ok
[WARN] OBD-1012: (127.0.0.1) clog and data use the same disk (/data)
Check before start obagent ok
Check before start prometheus ok
Check before start grafana ok
cluster scenario: htap
Start observer ok
observer program health check ok
Connect to observer 127.0.0.1:2881 ok
oceanbase bootstrap ok
obshell start ok
obshell program health check ok
obshell bootstrap ok
Start obagent ok
obagent program health check ok
Send /root/.obd/repository/obagent/4.2.3/afec8b3bd8933798b6435f4a41b4cc4c74a76c5f/conf/prometheus_config/rules to /data/ob43/prometheus/rules ok
Start promethues ok
prometheus program health check ok
Start grafana ok
grafana program health check ok
Connect to grafana ok
Grafana modify password ok
Connect to observer 127.0.0.1:2881 ok
Wait for observer init ok
+------------------------------------------------+
| oceanbase-ce |
+--------------+---------+------+-------+--------+
| ip | version | port | zone | status |
+--------------+---------+------+-------+--------+
| 127.0.0.1 | 4.3.5.3 | 2881 | zone1 | ACTIVE |
+--------------+---------+------+-------+--------+
obclient -h127.0.0.1 -P2881 -uroot@sys -p'GkVhFJClHO419jbTbjo7' -Doceanbase -A
cluster unique id: 80d2e97d-af5d-5848-905b-0a81685afa8e-19918946bff-03050304
Connect to Obagent ok
+-----------------------------------------------------------------+
| obagent |
+--------------+--------------------+--------------------+--------+
| ip | mgragent_http_port | monagent_http_port | status |
+--------------+--------------------+--------------------+--------+
| 127.0.0.1 | 8089 | 8088 | active |
+--------------+--------------------+--------------------+--------+
Connect to Prometheus ok
+----------------------------------------------------------+
| prometheus |
+--------------------------+-------+--------------+--------+
| url | user | password | status |
+--------------------------+-------+--------------+--------+
| http://127.0.0.1:9098 | admin | 'CCARlmzLVJ' | active |
+--------------------------+-------+--------------+--------+
Connect to grafana ok
+---------------------------------------------------------------------+
| grafana |
+--------------------------------------+-------+-------------+--------+
| url | user | password | status |
+--------------------------------------+-------+-------------+--------+
| http://127.0.0.1:3008/d/oceanbase | admin | 'oceanbase' | active |
+--------------------------------------+-------+-------------+--------+
obshell program health check ok
display ob-dashboard ok
+-------------------------------------------------------------------+
| ob-dashboard |
+--------------------------+------+------------------------+--------+
| url | user | password | status |
+--------------------------+------+------------------------+--------+
| http://127.0.0.1:2886 | root | 'GkVhFJClHO419jbTbjo7' | active |
+--------------------------+------+------------------------+--------+
ob_single_cli running
Get local repositories ok
Open ssh connection ok
Connect to observer 127.0.0.1:2881 ok
Create tenant obd_test ok
obclient -h127.0.0.1 -P'2881' -p'caip2018!' -uroot@obd_test -Doceanbase -A
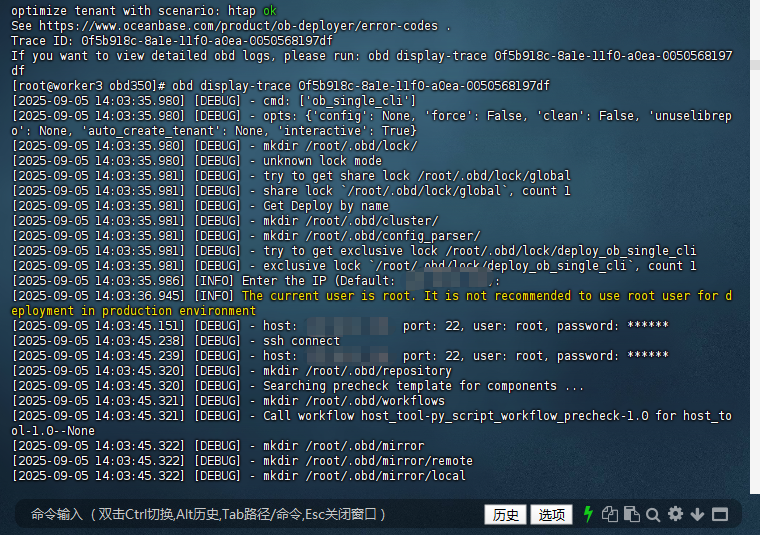
optimize tenant with scenario: htap ok
See https://www.oceanbase.com/product/ob-deployer/error-codes .
Trace ID: 0f5b918c-8a1e-11f0-a0ea-0050568197df
If you want to view detailed obd logs, please run: obd display-trace 0f5b918c-8a1e-11f0-a0ea-0050568197df
[root@worker3 obd350]#
(13)查看部署日志(可選)
若部署過程中出現錯誤,可通過 obd display-trace 命令查看詳細日志(日志中會標注錯誤原因,如“內存不足”“端口被占用”“權限不足”),示例中 Trace ID 為“0f5b918c-8a1e-11f0-a0ea-0050568197df”,執行以下命令即可查看日志:
[root@worker3 obd350]# obd display-trace 0f5b918c-8a1e-11f0-a0ea-0050568197df
3. 啟動集群并驗證
部署完成后,若集群未自動啟動(示例中已自動啟動,狀態為“running”),需手動啟動集群;隨后通過“查看集群狀態”“連接數據庫”驗證部署結果。
(1)啟動集群
若集群未啟動,執行以下命令(集群名需與部署時一致,示例為“ob_single_cli”):
obd cluster start ob_single_cli # 集群名與部署時一致
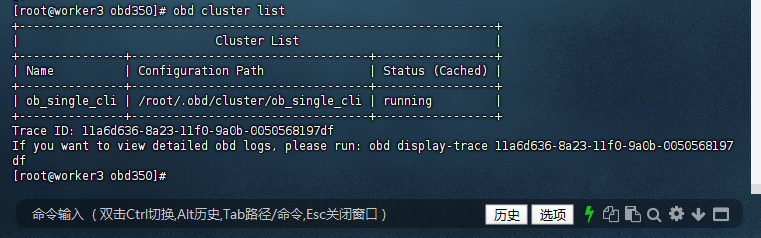
啟動后,可通過 obd cluster list 命令查看所有集群的狀態,示例中“ob_single_cli”的狀態為“running”,表示集群已正常啟動。
[root@worker3 obd350]# obd cluster list
+--------------------------------------------------------------------+
|                            Cluster List                            |
+---------------+----------------------------------+-----------------+
| Name          | Configuration Path               | Status (Cached) |
+---------------+----------------------------------+-----------------+
| ob_single_cli | /root/.obd/cluster/ob_single_cli | running         |
+---------------+----------------------------------+-----------------+
Trace ID: 11a6d636-8a23-11f0-9a0b-0050568197df
If you want to view detailed obd logs, please run: obd display-trace 11a6d636-8a23-11f0-9a0b-0050568197df
[root@worker3 obd350]#
(2)查看集群狀態
執行 obd cluster status 集群名 命令,查看集群的詳細狀態(如節點 IP、版本、端口、租戶狀態)。若輸出中“status”字段為“ACTIVE”或“running”,表示集群運行正常。
obd cluster status ob_single_cli
# 輸出中 "status" 為 "running" 或 "ACTIVE" 即成功
(3)連接數據庫(驗證可用性)
部署成功后,可通過 obclient(OceanBase 官方客戶端)或 mysql 客戶端連接數據庫。以下為兩種連接方式的示例(需替換為實際的 IP、端口與密碼):
(3.1):使用 mysql 客戶端連接系統租戶
若服務器已安裝 MySQL 客戶端,可直接使用以下命令連接(OceanBase 兼容 MySQL 協議):
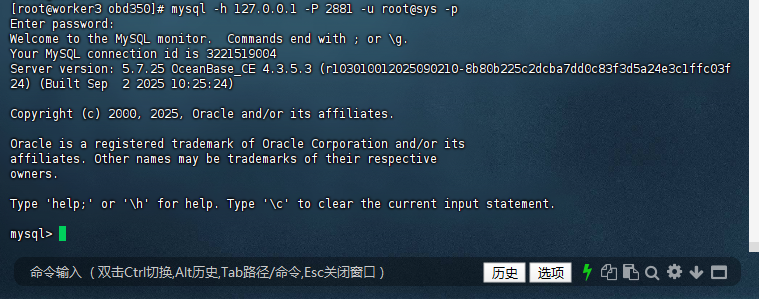
mysql -h 127.0.0.1 -P 2881 -u root@sys -p
輸入密碼后,若出現“Welcome to the MySQL monitor”提示,且顯示 OceanBase 版本信息(示例中為 4.3.5.3),表示數據庫連接成功,可正常執行 SQL 命令(如 show databases; 查看數據庫列表)。
[root@worker3 obd350]# mysql -h 127.0.0.1 -P 2881 -u root@sys -p
Enter password:
Welcome to the MySQL monitor.  Commands end with ; or \g.
Your MySQL connection id is 3221519004
Server version: 5.7.25 OceanBase_CE 4.3.5.3 (r103010012025090210-8b80b225c2dcba7dd0c83f3d5a24e3c1ffc03f24) (Built Sep  2 2025 10:25:24)

Copyright (c) 2000, 2025, Oracle and/or its affiliates.

Oracle is a registered trademark of Oracle Corporation and/or its
affiliates. Other names may be trademarks of their respective
owners.

Type 'help;' or '\h' for help. Type '\c' to clear the current input statement.

mysql>
同理,可連接業務租戶(如“obd_test”),驗證業務租戶的可用性:
mysql -h 127.0.0.1 -P 2881 -u root@obd_test -p'caip2018!'
四、總結
OBD 3.5.0 的白屏部署與交互式部署各有優勢:
- 白屏部署:可視化操作,零命令門檻,適合新手快速搭建測試環境;
- 交互式部署:命令行向導引導,參數配置更靈活,適合熟悉終端的用戶。
通過本文的步驟實操,相信讀者已能熟練掌握兩種部署方式。結合 OBD 豐富的管理命令,不僅能高效完成部署,還能輕松應對集群啟停、狀態檢查等日常運維工作。
建議新手從白屏部署入手,熟悉后嘗試交互式部署,逐步掌握配置文件批量部署(進階技能),全方位提升 OceanBase 運維效率。未來,期待 OBD 持續優化界面交互與報錯提示,讓數據庫部署更簡單、更智能!
通過以上步驟,即可完成 OBD 交互式部署 OceanBase 單機版的部署與基本管理。如需更多功能請參考官方文檔。
作者注:
——本文所有操作及測試均基于 OceanBase 的 OBD 3.5.0 版本完成。請注意,OceanBase 和 OBD 3.5.0 版本處于持續迭代中,部分語法或功能可能隨更新發生變化,請以 OceanBase 官方文檔 最新內容為準。
——以上僅為個人思考與建議,不代表行業普適觀點。以上所有操作均需在具備足夠權限的環境下執行,涉及生產環境時請提前做好備份與測試。文中案例與思路僅供參考,若與實際情況巧合,純屬無意。期待與各位從業者共同探討更多可能!
