


摘要
在創建數據庫集簇后,該集簇中默認會包含三個系統數據庫template1、template0和postgres,其中template0和postgres都是在初始化過程中從template1復制出來的。這個理論大家想必不是那么陌生,但是template1又是從哪里來的呢?帶著這個問題,下文將從代碼的角度探究postgres中1號數據庫的由來。
initdb源碼概覽
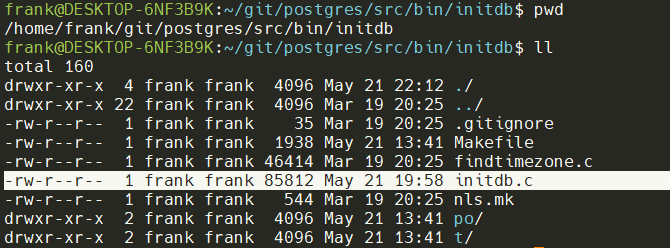
initdb代碼位于postgres源碼下src/bin/initdb/initdb.c中。
initdb主要功能是創建數據庫集簇,包括:
- 創建數據庫目錄,及目錄下一些必要的子目錄,如base、global、pg_tblspc等,所有要創建的子目錄保存在
subdirs[]中。
static const char *const subdirs[] = {
	"global",
	"pg_wal/archive_status",
	"pg_commit_ts",
	"pg_dynshmem",
	"pg_notify",
	"pg_serial",
	"pg_snapshots",
	"pg_subtrans",
	"pg_twophase",
	"pg_multixact",
	"pg_multixact/members",
	"pg_multixact/offsets",
	"base",
	"base/1",
	"pg_replslot",
	"pg_tblspc",
	"pg_stat",
	"pg_stat_tmp",
	"pg_xact",
	"pg_logical",
	"pg_logical/snapshots",
	"pg_logical/mappings"
};
- 測試當前服務器系統性能,由測試結果創建配置文件postgres.conf、pg_hba.conf、pg_ident.conf,并對其中定義的參數做一些設置。
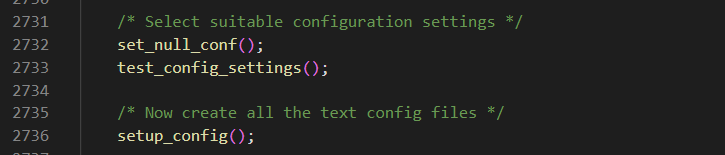
分別通過set_null_conf、test_config_settings、setup_config,設置空的配置文件、測試系統配置、設置配置文件。
測試系統配置: 由大到小測試連接數和共享內存的大小。同時檢查系統IPC的類型和時區。
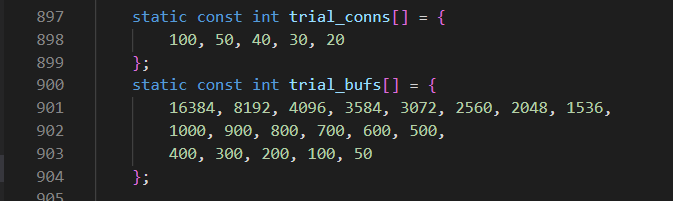
通過postgres測試模式對系統參數進行檢查,如大的參數檢查不過依次減小配置進行重新測試,檢查命令如下:
# 連接數檢測 100
postgres --check -F -c log_checkpoints=false  -c max_connections=100 -c shared_buffers=1000 -c dynamic_shared_memory_type=posix < "/dev/null" > "/dev/null" 2>&1

# 共享內存檢測 128M
postgres -check -F -c log_checkpoints=false  -c max_connections=100 -c shared_buffers=16384 -c dynamic_shared_memory_type=posix < "/dev/null" > "/dev/null" 2>&1
注意: 這個檢測只是針對初始化postgres基本的配置參數,實際生產應根據具體服務器的配置進行調整。此處可進行優化,根據檢查實際物理內存大小進行自動配合。
設置配置文件:根據檢測出的配置,替換模板的配置,模板文件放置在安裝目錄share子目錄下:
frank@DESKTOP-6NF3B9K:~/pgsql/share$ ll *.sample
-rw-r--r-- 1 frank frank  4703 May 21 22:42 pg_hba.conf.sample
-rw-r--r-- 1 frank frank  1636 May 21 22:42 pg_ident.conf.sample
-rw-r--r-- 1 frank frank   604 May 21 22:42 pg_service.conf.sample
-rw-r--r-- 1 frank frank 29431 May 21 22:42 postgresql.conf.sample
-rw-r--r-- 1 frank frank   278 May 21 22:42 psqlrc.sample
frank@DESKTOP-6NF3B9K:~/pgsql/share$ pwd
/home/frank/pgsql/share
- 在bootstrap模式下創建數據庫template1,存放在數據目錄的子目錄base/1下,并通過復制template1來創建template0和postgres兩個系統數據庫。
/* Bootstrap template1 */
bootstrap_template1();
// 創建template0
make_template0(cmdfd);
// 創建postgrs
make_postgres(cmdfd);
創建template1庫
進程間通信
Linux常用的進程間通信主要有共享內存、信號量、消息隊列這幾種,廣義講,夸主機的進程通信還可以使用socket,但postgres創建template1數據庫和進行服務器配置檢查使用的是管道的方式。
管道通信的代碼:
/*
 * macros for running pipes to postgres
 */
#define PG_CMD_DECL		char cmd[MAXPGPATH]; FILE *cmdfd

#define PG_CMD_OPEN \
do { \
	cmdfd = popen_check(cmd, "w"); \
	if (cmdfd == NULL) \
		exit(1); /* message already printed by popen_check */ \
} while (0)

#define PG_CMD_CLOSE \
do { \
	if (pclose_check(cmdfd)) \
		exit(1); /* message already printed by pclose_check */ \
} while (0)

#define PG_CMD_PUTS(line) \
do { \
	if (fputs(line, cmdfd) < 0 || fflush(cmdfd) < 0) \
		output_failed = true, output_errno = errno; \
} while (0)

#define PG_CMD_PRINTF(fmt, ...) \
do { \
	if (fprintf(cmdfd, fmt, __VA_ARGS__) < 0 || fflush(cmdfd) < 0) \
		output_failed = true, output_errno = errno; \
} while (0)
步驟如下:
- 以bootstrap模式啟動postgres進程并打開寫管道:
啟動命令:postgres --boot -X 16777216 -F -c log_checkpoints=false -d 5
- –boot,以bootstrap模式啟動,這個參數必須作為第一個參數。
- 關閉fsync
- -c 配置參數 不開啟日志檢查點
- -d 開啟debug日志,5是最高級別的debug日志
- -X 設置wal文件大小,16M
- 將bki文件中的命令發送至postgres進程,完成對象的創建。
bki文件
這里先挖個坑吧,后續會詳細學習一下bki的使用與執行過程。
bki文件在源碼的postgres/src/backend/catalog目錄下,安裝完成后在share目錄下。文件名為postgres.bki。
語法與標準sql類似:
# PostgreSQL 15
create pg_proc 1255 bootstrap rowtype_oid 81
 (
 oid = oid ,
 proname = name ,
 ......
 prosrc = text FORCE NOT NULL ,
 probin = text ,
 prosqlbody = pg_node_tree ,
 proconfig = _text ,
 proacl = _aclitem
 )
insert ( 1242 boolin 11 10 12 1 0 0 0 f f f t f i s 1 0 16 2275 _null_ _null_ _null_ _null_ _null_ boolin _null_ _null_ _null_ _null_ )
insert ( 1243 boolout 11 10 12 1 0 0 0 f f f t f i s 1 0 2275 16 _null_ _null_ _null_ _null_ _null_ boolout _null_ _null_ _null_ _null_ )
......
創建template1和其中的系統表。
template1中的對象
創建了如下的系統表(共64個):
frank@DESKTOP-6NF3B9K:~/pgsql/share$ cat postgres.bki | grep "create pg_"
create pg_proc 1255 bootstrap rowtype_oid 81
create pg_type 1247 bootstrap rowtype_oid 71
create pg_attribute 1249 bootstrap rowtype_oid 75
create pg_class 1259 bootstrap rowtype_oid 83
create pg_attrdef 2604
create pg_constraint 2606
create pg_inherits 2611
create pg_index 2610
create pg_operator 2617
create pg_opfamily 2753
create pg_opclass 2616
create pg_am 2601
create pg_amop 2602
create pg_amproc 2603
create pg_language 2612
create pg_largeobject_metadata 2995
create pg_largeobject 2613
create pg_aggregate 2600
create pg_statistic 2619
create pg_statistic_ext 3381
create pg_statistic_ext_data 3429
create pg_rewrite 2618
create pg_trigger 2620
create pg_event_trigger 3466
create pg_description 2609
create pg_cast 2605
create pg_enum 3501
create pg_namespace 2615
create pg_conversion 2607
create pg_depend 2608
create pg_database 1262 shared_relation rowtype_oid 1248
create pg_db_role_setting 2964 shared_relation
create pg_tablespace 1213 shared_relation
create pg_authid 1260 shared_relation rowtype_oid 2842
create pg_auth_members 1261 shared_relation rowtype_oid 2843
create pg_shdepend 1214 shared_relation
create pg_shdescription 2396 shared_relation
create pg_ts_config 3602
create pg_ts_config_map 3603
create pg_ts_dict 3600
create pg_ts_parser 3601
create pg_ts_template 3764
create pg_extension 3079
create pg_foreign_data_wrapper 2328
create pg_foreign_server 1417
create pg_user_mapping 1418
create pg_foreign_table 3118
create pg_policy 3256
create pg_replication_origin 6000 shared_relation
create pg_default_acl 826
create pg_init_privs 3394
create pg_seclabel 3596
create pg_shseclabel 3592 shared_relation rowtype_oid 4066
create pg_collation 3456
create pg_parameter_acl 6243 shared_relation
create pg_partitioned_table 3350
create pg_range 3541
create pg_transform 3576
create pg_sequence 2224
create pg_publication 6104
create pg_publication_namespace 6237
create pg_publication_rel 6106
create pg_subscription 6100 shared_relation rowtype_oid 6101
create pg_subscription_rel 6102
- pg_xxx:對象名
- 后面的 數字為 對象的oid
- 如果聲明了
bootstrap,那么該表將只在磁盤上創建;不會向pg_class、pg_attribute等表里面輸入任何與該表相關的東西。因此這樣的表將無法被普通的SQL操作訪問,直到那些記錄被用硬辦法(用insert命令)建立。 這個選項用于創建pg_class等表本身。 - 如果聲明了
shared_relation,那么表就作為共享表創建。除非聲明了without_oids,否則表將會有OID。表的行類型OID(pg_type的OID)可以有選擇性地通過rowtype_oid子句指定。如果沒有指定,會為之自產生一個OID(如果bootstrap被指定,則rowtype_oid是無效的,但不管怎樣它還是被寫在了文檔中)。
將template1插入至pg_database
open pg_database
insert ( 1 template1 10 ENCODING LOCALE_PROVIDER t t -1 0 1 1663 LC_COLLATE LC_CTYPE ICU_LOCALE _null_ _null_ )
close pg_database
把1號數據庫設為創建數據庫的默認模板
create pg_shdescription 2396 shared_relation
 (
 objoid = oid ,
 classoid = oid ,
 description = text FORCE NOT NULL
 )
open pg_shdescription
insert ( 1 1262 'default template for new databases' )
close pg_shdescription
在pg_namespace中插入3個模式。
create pg_namespace 2615
 (
 oid = oid ,
 nspname = name ,
 nspowner = oid ,
 nspacl = _aclitem
 )
open pg_namespace
insert ( 11 pg_catalog 10 _null_ )
insert ( 99 pg_toast 10 _null_ )
insert ( 2200 public 6171 _null_ )
close pg_namespace
postgres支持的3種內置pl語言
create pg_language 2612
 (
 oid = oid ,
 lanname = name ,
 lanowner = oid ,
 lanispl = bool ,
 lanpltrusted = bool ,
 lanplcallfoid = oid ,
 laninline = oid ,
 lanvalidator = oid ,
 lanacl = _aclitem
 )
open pg_language
insert ( 12 internal 10 f f 0 0 2246 _null_ )
insert ( 13 c 10 f f 0 0 2247 _null_ )
insert ( 14 sql 10 f t 0 0 2248 _null_ )
close pg_language
兩個默認的表空間
create pg_tablespace 1213 shared_relation
 (
 oid = oid ,
 spcname = name ,
 spcowner = oid ,
 spcacl = _aclitem ,
 spcoptions = _text
 )
open pg_tablespace
insert ( 1663 pg_default 10 _null_ _null_ )
insert ( 1664 pg_global 10 _null_ _null_ )
close pg_tablespace
幾個關鍵的oid
| oid | 對象 |
|---|---|
| 1 | template1 |
| 10 | POSTGRES |
| 6171 | pg_database_owner |
| 2200 | public |
| 11 | pg_catalog |
| 99 | pg_toast |
| 1262 | pg_database |
pg_namespace
insert ( 2200 public 6171 _null_ )
根據oid可以看到,public模式在postgres 15中的owner是6171,即pg_database_owner,這是15的新特新。
創建template0庫
template0是使用標準SQL進行創建的。
		"CREATE DATABASE template0 IS_TEMPLATE = true ALLOW_CONNECTIONS = false"
		" OID = " CppAsString2(Template0DbOid)
		" STRATEGY = file_copy;\n\n",
- IS_TEMPLATE = true:template0是個模板庫。
- ALLOW_CONNECTIONS = false :不允許客戶端鏈接
- #define Template0DbOid 4 宏定義了template0的oid
- STRATEGY = file_copy :通過文件copy的方式創建。
對template1和template0的datcollversion進行設置
		/*
		 * template0 shouldn't have any collation-dependent objects, so unset
		 * the collation version.  This disables collation version checks when
		 * making a new database from it.
		 */
		"UPDATE pg_database SET datcollversion = NULL WHERE datname = 'template0';\n\n",

		/*
		 * While we are here, do set the collation version on template1.
		 */
		"UPDATE pg_database SET datcollversion = pg_database_collation_actual_version(oid) WHERE datname = 'template1';\n\n",
回收權限
		/*
		 * Explicitly revoke public create-schema and create-temp-table
		 * privileges in template1 and template0; else the latter would be on
		 * by default
		 */
		"REVOKE CREATE,TEMPORARY ON DATABASE template1 FROM public;\n\n",
		"REVOKE CREATE,TEMPORARY ON DATABASE template0 FROM public;\n\n",
添加注釋
"COMMENT ON DATABASE template0 IS 'unmodifiable empty database';\n\n",
去死皮^_^
		/*
		 * Finally vacuum to clean up dead rows in pg_database
		 */
		"VACUUM pg_database;\n\n",
創建postgres庫
/*
 * copy template1 to postgres
 */
static void
make_postgres(FILE *cmdfd)
{
	const char *const *line;

	/*
	 * Just as we did for template0, and for the same reasons, assign a fixed
	 * OID to postgres and select the file_copy strategy.
	 */
	static const char *const postgres_setup[] = {
		"CREATE DATABASE postgres OID = " CppAsString2(PostgresDbOid)
		" STRATEGY = file_copy;\n\n",
		"COMMENT ON DATABASE postgres IS 'default administrative connection database';\n\n",
		NULL
	};

	for (line = postgres_setup; *line; line++)
		PG_CMD_PUTS(*line);
}
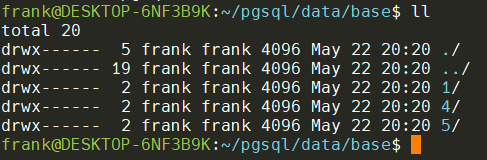
可以看到postgres就是對template1的直接復制。
其oid為5

可以看到在執行完initdb后,base目錄下共有3個子目錄,分別是1,4,5
結束
本文通過源碼分析了template1、template0和postgres的創建過程,也是initdb進程的運行過程。希望能從底層邏輯來理解postgres的一些特性,更有助于對postgres運行邏輯的深入理解,希望對大家有所幫助。
備注
本期挖的坑,后續填上。
| 待填的坑 | 挖坑時間 |
|---|---|
| 理解bki | 2022-05-22 |
